Almost any jar works for this project, Baby-food, and olive jars are good size jars for this project. Look for plastic or ceramic figurines (metal ones are prone to rust) at flea markets and hobby stores. It is helpful to have the jar with your when you are shopping to ensure the figure fits through the opening.
If the jar lids are not in seasonal colors already, simply paint them with oil-based enamel paint. Sand the inside of the lid until the surface is rough. With clear-drying epoxy, adhere the figurine to the inside of the lid, and let the epoxy dry.
If the jar lids are not in seasonal colors already, simply paint them with oil-based enamel paint. Sand the inside of the lid until the surface is rough. With clear-drying epoxy, adhere the figurine to the inside of the lid, and let the epoxy dry.
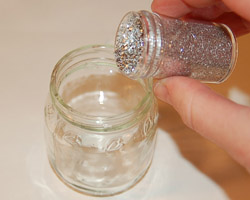
Fill the jar almost to the top with distilled water, add a pinch of glitter and a dash of glycerin to keep the glitter from falling too quickly. Don't add too much, or the glitter will stick to the bottom of the jar when it's flipped. Screw on the lid tightly, being careful not to dislodge the figurine. The jar lid is now the base for your newly made snow globe.
Viola, your have a custom snow globe!
See the full instructions at Marthastewart.com: Snow Globes - Martha Stewart Crafts
No comments:
Post a Comment